Saturday, December 20, 2008

Baking in a Winter Wonderland

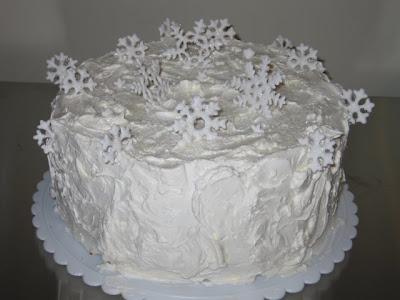
Tis the season for cookie baking! And that's mainly what I've been doing. Last weekend I did do a couple of cakes. The snowflake cake is a White Almond Sour Cream cake with Swiss Meringue Buttercream. I made royal icing snowflakes to decorate the top. Amazingly, by sheer luck, only one broke in the process of removing them from the wax paper and placing them on the cake.

I was looking for a simple way to dress up a rum cake and needed something I could do in advance. So I made a few poinsettias. I had forgotten how fun (and easy!) it is to do flowers.

Taking away from my cake time, also, was sewing for a craft fair. CLO put on the fair and I made baby blankets and angel dolls.

Merry Christmas and Happy Baking!

Friday, October 17, 2008

Garlic Bread


There is nothing I love to bake more than bread and nothing compares to a warm loaf right out of the oven. This Garlic Bread makes the house smell so good!

Garlic Bread

2 cloves garlic, minced
2 tbsp olive oil
1 c lukewarm water
2 tbsp sugar
1 tsp salt
2 1/4 tsp or 1 pkg yeast
2 1/2 to 3 1/2 c all purpose flour
2 tbsp parmesan cheese
1/4 c romano cheese

In a small skillet, combine the garlic and olive oil. Heat over medium heat just until the garlic starts to brown. Remove from heat and pour into a large bowl and allow to cool.
Meanwhile, combine the water (not over 110 degrees) sugar, salt, and yeast. Let set for 5 minutes or until yeast starts to foam. Add to the cooled oil. Add in 2 1/2 c flour and mix with a wooden spoon until a thick dough forms. Turn out onto a floured surface and knead until smooth - about 5 minutes. I prefer a slightly sticky, looser dough. You may not need all of the flour.
Place dough in a well oiled bowl and cover with plastic wrap. Place in a warm, draft-free place for 1 hour or until doubled in bulk. (I like to turn my oven on to 150 degrees and set my bowl on top of the stove.)
Preheat oven to 400 degrees. Once the dough has doubled in bulk, punch down and allow to rest for 5 minutes. Shape into a rectangle and place on a baking sheet. Sprinkle with cheeses. Bake for 15 minutes or until browned.

Monday, October 13, 2008

Baking Up a Storm!

This was a baptism cake. It's an Italian Cream Cake with coconut filling covered in marshmallow fondant. The letters are painted with gold pearl dust. I think it turned out so pretty.


An autumn wreath! It's just sugar cookies pieced together on a cake circle and glued together with royal icing. The bow is made out of fondant. My brother-in-law helped me color the dough of the cookies and cut-out the leaves. He did a really good job. The acorns are chocolate cookies. I dusted it with shimmer powder and sold it at the bake sale!


A birthday cake for the Ambassador. It's a French Vanilla Sour Cream cake with strawberry filling iced in chocolate and vanilla Swiss Meringue Buttercream (another post...). He's from South Carolina and loves baseball. So I added the palmetto palms to the baseball field. This cake was missing something. I wasn't totally satisfied with it. But it sure did taste good!


For my mother-in-law's 50th birthday I made her a stained glass glass cake. I pieced together fondant and used royal icing painted with silver pearl dust for the leading. It turned out really pretty. The cake itself was chocolate zucchini with chocolate Swiss Meringue Buttercream.

Sunday, October 12, 2008

Lemon Ricotta Cookies


I had a tub of ricotta in the fridge and wanted to use it for something sweet. One of the reasons I LOVE ricotta cheese is that it can be used for both sweet and savory. These cookies are light and not too sweet. This is a Giada recipe...

Lemon Ricotta Cookies with Lemon Glaze

2 1/2 c flour
1 tsp baking powder
1 tsp salt
1/2 c butter, softened
2 c sugar
2 eggs
1 15 oz container whole milk ricotta (I used light...)
3 T lemon juice
1 lemon, zested

Preheat the oven to 375 degrees. Combine the flour, baking soda and salt and set aside.

In the large bowl combine the butter and the sugar. Using an electric mixer beat the butter and sugar until light and fluffy, about 3 minutes. Add the eggs, 1 at a time, beating until incorporated. Add the ricotta cheese, lemon juice, and lemon zest. Beat to combine. Stir in the dry ingredients.

Line 2 baking sheets with parchment paper. (Very, very important to use the parchment paper! The dough is very soft and will stick to your cookie sheet. Once you're done baking, save the parchment paper to put under your cooling rack to catch all of the glaze that drips off. ) Spoon the dough (about 2 tablespoons for each cookie) onto the baking sheets. Bake for 15 minutes, until slightly golden at the edges. Remove from the oven and let the cookies rest on the baking sheet for 20 minutes.


Lemon Glaze


  • 1 1/2 cups powdered sugar
  • 3 tablespoons lemon juice
  • 1 lemon, zested
Combine the powdered sugar, lemon juice, and lemon zest in a small bowl and stir until smooth. Spoon about 1/2-teaspoon onto each cookie and use the back of the spoon to gently spread. Let the glaze harden for about 2 hours.


Okay, so how did I change the recipe? Well, first, I didn't have any lemons, so I replaced the zest with a teaspoon of lemon extract. I don't recommend this. If possible, use the zest - it's much better. But the extract does work in a pinch. Secondly, I used light ricotta. I try to save calories where I can. Thirdly, I used the whisk to drizzle the glaze onto the cookies. It was a good recipe, what can I say?

I really liked these cookies. They were easy to make and not overly sweet. They'd go well with a cup of coffee.

To find more of Giada's recipes visit http://www.foodnetwork.com/giada-de-laurentiis/index.html
Monday, September 29, 2008

Retiring to the Beach

This cake was for a gentleman getting ready to retire and move to Florida, so his office asked me to make a cake for his farewell. It is a Darn Good Chocolate Cake with mocha icing covered in white chocolate marshmallow fondant. The sand is ice cream cones, Cherrios, Fibre 1, and brown sugar. (Normallt I just use graham crackers...there were none to be found in my pantry.) I painted the fondant with tinted piping gel for the water.

Some detail of the tree. Now, these were time consuming. Hours and hours of work. I covered a pillar with chocolate fondant and then cut individual pieces to make the bark. The leaves weren't so bad. After they had dried for a week, I glued wire onto them with royal icing. I then stuck the wires into the pillars. Voila! A palm tree. I wish I could take credit for their design, but I can't. It is from a cake on the Wilton site.

The detail of the people...I am by no means a sculptor and it has been awhile since I've actually made something out of clay, or play clay for that matter. But I don't think they turned out half-bad. I couldn't make them too tan...they are moving from the north.

Thursday, September 25, 2008

Pumpkin Chocolate Chip Bread

A friend had given me this recipe a couple years ago and, I'm sorry to say, I'm just now getting around to trying it. It smelled delicious. I've tweaked the baking temperature because the outer edges were much too done before the middle was barely set. I'd also recommend baking it with a flower nail in the center for the same reason. It was okay. I took it to a playgroup and it was a total hit with the kids.

Pumpkin Chocolate Chip Bread
(Original recipe from Taste of Home)

3 c all purpose flour
2 tsp cinnamon
1 tsp salt
1 tsp baking soda
4 eggs
2 c sugar
2 c canned pumpkin
1 1/2 c vegetable oil
1 1/2 c semi-sweet chocolate chips

Preheat oven to 325 F. Grease two loaf pans. (I suggest greasing a flower nail and placing it in the center of each pan as well.) Combine flour, cinnamon, salt, and baking soda. In a separate bowl, beat the eggs, suar, pumpkin and oil. Stir into dry ingredients just until moistened. Fold in chocolate chips. Pour into pans. Bake for 60-70 minutes or until a toothpick inserted near the center comes out clean. Cool for 10 minutes then remove from pans and cool on a wire rack.
Makes 2 loaves.

Tuesday, September 23, 2008

Reese's Peanut Butter Cup Peanut Butter Cookies

Lots of evenings my husband snacks on the Reese's Peanut Butter and Milk Chocolate Baking Morsels. So last night at supper, he casually mentioned that wouldn't some cookies with those in them be good? Of course! (I've made them before, he just didn't remember...) There is a recipe on the package, but I thought that adding the morsels to a peanut butter cookie would be even better. This is what I came up with:

Reese's Peanut Butter Cup Peanut Butter Cookies
1/4 c softened butter
1/4 c shortening
1/2 c peanut butter (I really prefer to use Jif)
1 scant cup granulated sugar
1 tsp vanilla
1 egg
1/2 tsp salt
1/2 tsp baking powder
1 1/2 c all purpose flour
1 pkg Reese's PB cup baking chips

Preheat oven to 350 F. Cream the butter, shortening and peanut butter until smooth. Add in sugar and beat until fluffy. Add in vanilla and egg. Mix well. Add salt, baking powder and flour mixing until well combined. Add in the Reese's and mix by hand. (Mixing with the mixer breaks up the pieces. Of course, if you would like your pieces broken up, that could be really good, too, then by all means - mix with the mixer!) Roll into 1" balls (I use the Pampered Chef medium scoop) and place on your baking sheet. Bake for 10-12 minutes, until just golden brown on top. Let rest for 2 minutes on sheet before removing to cool completely on a wire rack.

I can't give my own review...trying to lose that baby weight!...but Cyle said they were delicious.

Welcome to Baking at Huckleberries!

Welcome to my baking blog! I'm a stay-at-home-mom that loves to bake. Huckleberries is my kitchen. It's only right that it should be given a name as it's where I spend most of my days. This way, though I'm not leaving the house, I can say, "I'm going to Huckleberries!" and voila! I've stepped into a different place. Huckleberries is where I go to relax, to create, to spend time with and teach my children. It is a large, spacious kitchen that is terribly inefficient and has too little counter space, but it does have a nice large window that I can look out while I do dishes and lots of floor space for my little ones to play. I hope you enjoy reading about my adventures in cooking!